There's a certain magic to a perfectly baked cookie, and when it comes to classic comfort, few treats rival the humble yet elegant thumbprint cookie. These delightful morsels, with their buttery, melt-in-your-mouth base and sweet, jewel-toned jam filling, have graced countless holiday platters. But why relegate such a simple pleasure to just one season? It's time to liberate the thumbprint cookie from its holiday-only reputation and embrace its year-round appeal. Prepare to discover how easy it is to bake perfect thumbprint cookies, along with expert tips that will elevate your baking game and ensure every bite is pure bliss.
What Makes Thumbprint Cookies a Timeless Treat?
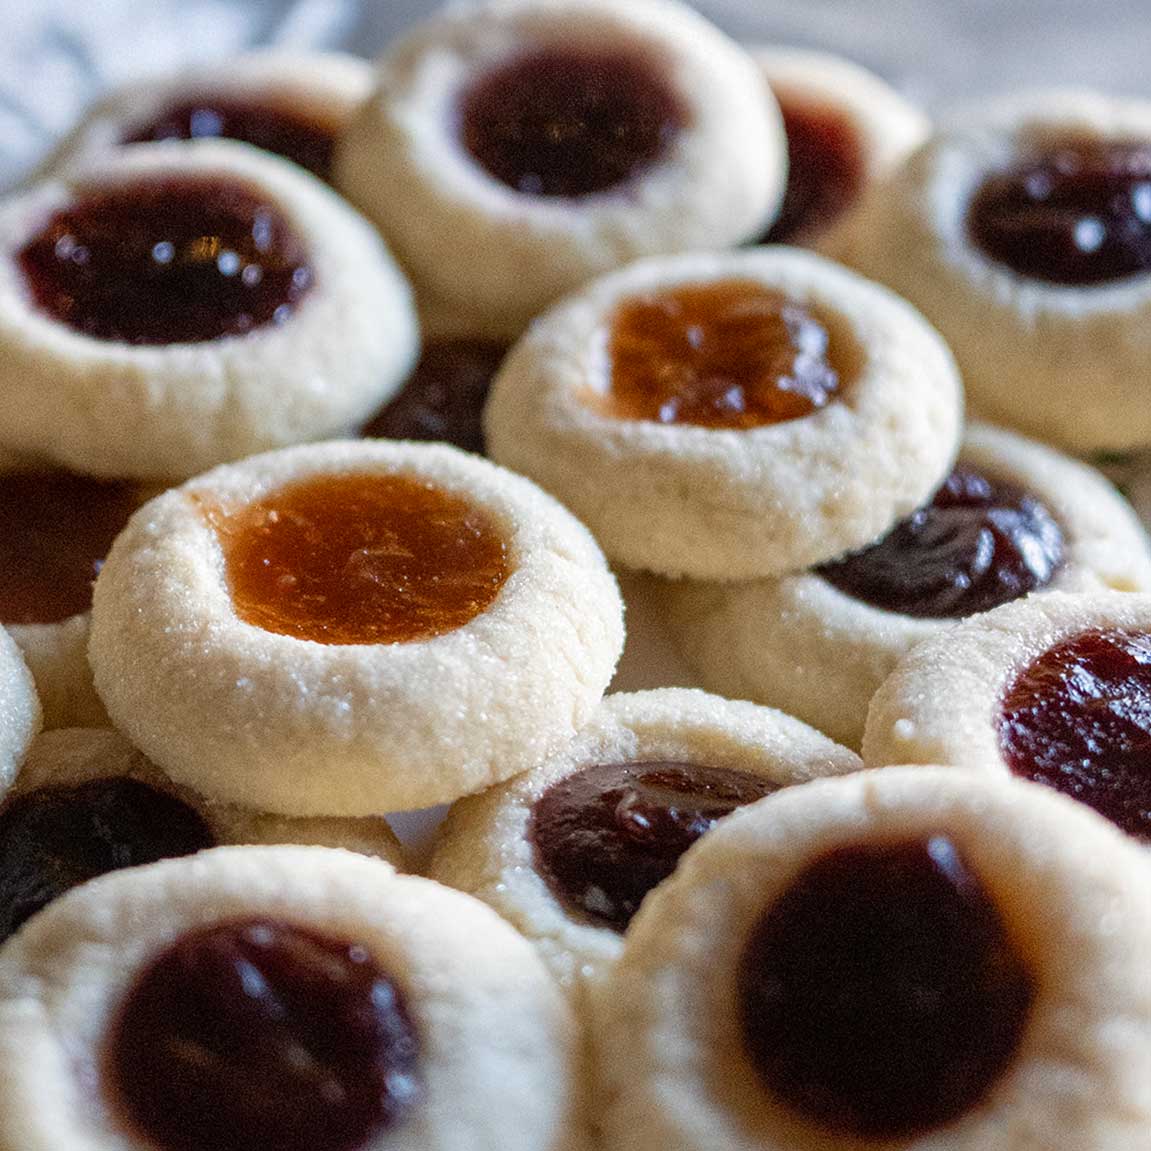
At its heart, a thumbprint cookie is a testament to the beauty of simplicity. These classic cookies are known for their rich, buttery flavor and delicate, crumbly texture, often likened to a fine shortbread. The name itself, thumbprint cookie, comes from the distinctive indentation made in the center of each dough ball – traditionally with a thumb, though other methods work just as well – which is then filled with a vibrant sweet preserve. It’s this charming detail and the contrast of buttery cookie with fruity jam that makes them so irresistibly appealing.
While often associated with festive gatherings and cookie swaps, the truth is there’s nothing inherently “holiday” about these treats. Their straightforward ingredient list and uncomplicated preparation make them accessible for bakers of all skill levels, and a truly rewarding project to share with aspiring young chefs. Kids especially love the hands-on fun of rolling the dough and pressing the indents, turning baking into a delightful family activity. The traditional raspberry jam filling is a fan favorite, but as we’ll explore, the possibilities for customization are endless, from different fruit preserves to decadent chocolate ganache or creamy caramel.
Why Thumbprint Cookies Deserve Year-Round Attention
It's a common misconception that certain cookie recipes, like peanut butter blossoms or even coconut macaroons, are exclusively for the holiday season. Thumbprint cookies often fall into this category, inexplicably tucked away until December. But why limit such a perfect balance of sweet and buttery? Imagine a plate of fresh thumbprint cookies bringing a touch of cheer to a summer picnic, a school bake sale, or simply brightening an ordinary Tuesday afternoon.
Their simple elegance makes them versatile for any occasion. They’re light enough for an afternoon tea, satisfying enough for an after-dinner treat, and beautiful enough for a special celebration. Plus, the minimal ingredient list typically involves pantry staples like flour, butter, sugar, and eggs, meaning you're often just a few steps away from baking a batch without a special grocery run. Embrace the joy of spontaneous baking! For more inspiration on when and how to enjoy these delightful cookies throughout the year, be sure to check out our comprehensive guide: Beyond the Holidays: Your Guide to Year-Round Thumbprint Cookies.
The Core Recipe: Crafting Melt-in-Your-Mouth Thumbprint Cookies
Making thumbprint cookies isn't just baking; it's an act of creating small, edible works of art. The foundation of any great thumbprint cookie is, of course, the dough. It should be rich, tender, and just sturdy enough to hold its shape while baking, yielding that characteristic melt-in-your-mouth texture. Here’s a general overview of the steps involved in bringing these beauties to life:
- Creaming the Essentials: You’ll typically start by creaming together softened butter with sugar until light and fluffy. This step incorporates air, contributing to the cookie's delicate texture. An egg yolk and vanilla extract are often added next for richness and flavor.
- Adding Dry Ingredients: Flour, sometimes with a pinch of salt, is gradually mixed in until just combined. Overmixing can lead to tough cookies, so aim for a barely cohesive dough.
- Chilling for Success: Many recipes call for chilling the dough. This isn't just about making it easier to handle; chilling allows the butter to firm up, preventing the cookies from spreading too much in the oven, and also gives the flavors time to meld.
- Shaping the Dough: Once chilled, the dough is rolled into uniform balls, typically about an inch in diameter. Consistency in size ensures even baking.
- Making the Indentations: This is where the "thumbprint" comes in! Gently press an indentation into the center of each dough ball. While your thumb works, a ½ teaspoon measuring spoon can create a perfectly uniform and slightly deeper well. We’ll delve into troubleshooting common issues here shortly!
- Filling with Flavor: Spoon your chosen jam or filling into the indentations.
- Baking to Golden Perfection: Bake until the edges are lightly golden and the cookies are set. Be careful not to overbake, as this can dry out the cookies.
Pro Tips for Perfect Thumbprint Cookies Every Time
While the recipe itself is straightforward, a few expert tips can make the difference between good thumbprint cookies and truly unforgettable ones. Mastering these small techniques will ensure your cookies are consistently delicious and visually appealing.
Solving the Cracking Dough Dilemma
One of the most common frustrations bakers encounter with thumbprint cookies is the dough cracking around the edges when making the indentation. This often happens if the dough is too cold, too dry, or simply not pliable enough. Here’s how to prevent it:
- Slightly Warmer Dough: If your dough is fresh out of the fridge and very firm, let it sit at room temperature for 5-10 minutes before rolling and indenting. This slight softening will make it more malleable.
- Gentle Pressure: Don't press too hard, too fast. Use a gentle, twisting motion with your thumb or spoon to create the well.
- Repair as You Go: If a small crack appears, simply gently pinch the edges back together with your fingers before filling.
- Optimal Hydration: Ensure your dough isn't too dry. If it feels crumbly even at room temperature, you might need to add a tiny bit more butter or a touch of milk during mixing next time.
The Importance of Quality Jam & Creative Fillings
Since the jam is such a prominent flavor, its quality truly matters. A good quality jam or preserve will deliver a more intense, natural fruit flavor that shines through. Raspberry jam or preserves are classic for a reason, offering a delightful balance of sweet and tart. However, don’t limit yourself!
- Recommended Jams: Look for brands known for their fruit content and natural flavors, or even better, use homemade jam. Apricot, blackberry, peach, or citrus marmalade are all fantastic alternatives.
- Beyond Jam: The versatility of thumbprint cookies extends far beyond fruit preserves. Experiment with:
- Chocolate Ganache: A rich, decadent filling that pairs beautifully with the buttery cookie.
- Lemon Curd: For a bright, tangy twist that’s perfect for spring or summer.
- Caramel Sauce: A sweet and chewy option that's always a crowd-pleaser.
- Nutella or Other Nut Butters: For a comforting, nutty flavor.
- Cream Cheese Frosting: A dollop of creamy frosting adds a different texture and richness.
To dive deeper into the world of fillings and discover endless creative possibilities, explore our dedicated guide: Mastering Thumbprint Cookies: The Best Jam & Filling Ideas.
Chilling the Dough: Your Secret Weapon
Don't skip the chilling step! Even 30 minutes in the refrigerator can make a significant difference. Chilled dough is easier to handle, less sticky, and prevents the cookies from spreading too thin in the oven, helping them maintain their perfect shape and tender crumb.
Freezing for Future Feasts
Thumbprint cookies are excellent candidates for make-ahead baking. You can freeze the shaped, unbaked dough balls (with indentations but without filling) for up to a month. Simply arrange them on a baking sheet, freeze until solid, then transfer to an airtight container or freezer bag. When ready to bake, place the frozen dough balls on a baking sheet, fill with jam, and bake as usual, adding a few extra minutes to the baking time.
Finishing Touches
For an extra touch of sweetness and visual appeal, consider rolling the dough balls in granulated sugar or finely chopped nuts (like pecans or walnuts) before making the indentation. This adds a lovely crunch and subtle flavor contrast to the final cookie.
From their charming appearance to their delightful taste, thumbprint cookies are truly a joy to bake and share. By understanding the nuances of the dough, embracing creative filling options, and applying these simple pro tips, you're well on your way to baking a perfect batch every time. So, preheat your oven, gather your ingredients, and get ready to create a timeless treat that will bring smiles to faces, no matter the season.
